
At this time, I often go thru and make the smaller pieces slightly thicker than the base piece that they are associated with. For example, the side view (green) below is 0.5 units thick, but the windows (yellow) are 1.0 units thick (Z axis). I also commonly change the colors so that they stand out better against each other.
Now, use GlueAsSibling to group all of the items for each section of the drawing.. all the side pieces, all the top pieces, all the front pieces, as 3 separate major groups.
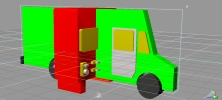
Then, take the Side group and in the Object Info window, enter -90 for the X rotation. This stands it up properly. Also, put zero (0) in each of the Location boxes.. to center the group around the origin.
Take the group of Front objects and also rotate it X= -90 but add Y=90. Set X,Y,Z Locations to zero (center), and you should have something that looks like the drawing below.
Sizing: very often, at this point, I group everything together into a single object. Then, I use the Object Info Panel to set the overall dimensions of the object. This leaves me where I can get back to the discrete pieces, but I end up with the overall model at the correct size. The reason I do this is that in the next step, we must start considering the design limits required by Shapeways. If you resize ALL of the objects at the same time, then you can ensure that individual pieces maintain their general shape.
Click to SCN file. |
Step 7: merge the shapes